Pi Pico
Introduction
Project using Raspberry Pi Pico and other RP2040 boards to communicate with pronged and infrared Digimon toys. There is a choice between Arduino and CircuitPython firmware, providing different functionality. This is a brief guide for people already familiar with the DMComm project.
This document is part of the DMComm Software under the MIT License.
WiFiCom
WiFiCom is a closely related project to communicate with Digimon toys over WiFi. The build includes the circuits described here. If you build the project on this page using Pi Pico W, it can be upgraded to a WiFiCom in the future. If using Pi Pico W for the project on this page, adding the visible LED circuit on GP10 is recommended but not required. Installing the WiFiCom firmware is now recommended even on non-WiFi boards.
Circuit
Schematic (including WiFiCom in lower half, updated 2023-09-03).
The schematic shows the different sections of the circuit for each type of device. You can leave out any sections you’re not using. The IR LED circuit can be used by itself for D-Scanner barcodes, and in that case a red LED also works. On the schematic, some pins on the Pi Pico are reserved for related projects but not explained in this guide.
The new prong circuit is a 3-state level shifter like a D-Com, but with far fewer components. It can’t be used on 8-bit AVR because of a difference in how the pins are controlled.
Check board_config.py for recommended pins on Arduino Nano RP2040 Connect and Seeeduino Xiao RP2040. ProngOutput takes parameters prong_drive_signal and prong_weak_pull. prong_drive_low must be prong_drive_signal+1 in terms of RP2040 GPIO numbers, which don’t always match up with the pin numbers on the board. If using a different RP2040 board, check the schematic for your board, and make sure to choose pins which follow this rule.
Parts list
Insulated breadboard wires are good for connecting far-apart holes, and can be used for connectors to pronged toys. For short breadboard connections of 2-5 holes with no other components in between, you can get a neater result by using legs cut from extra resistors.
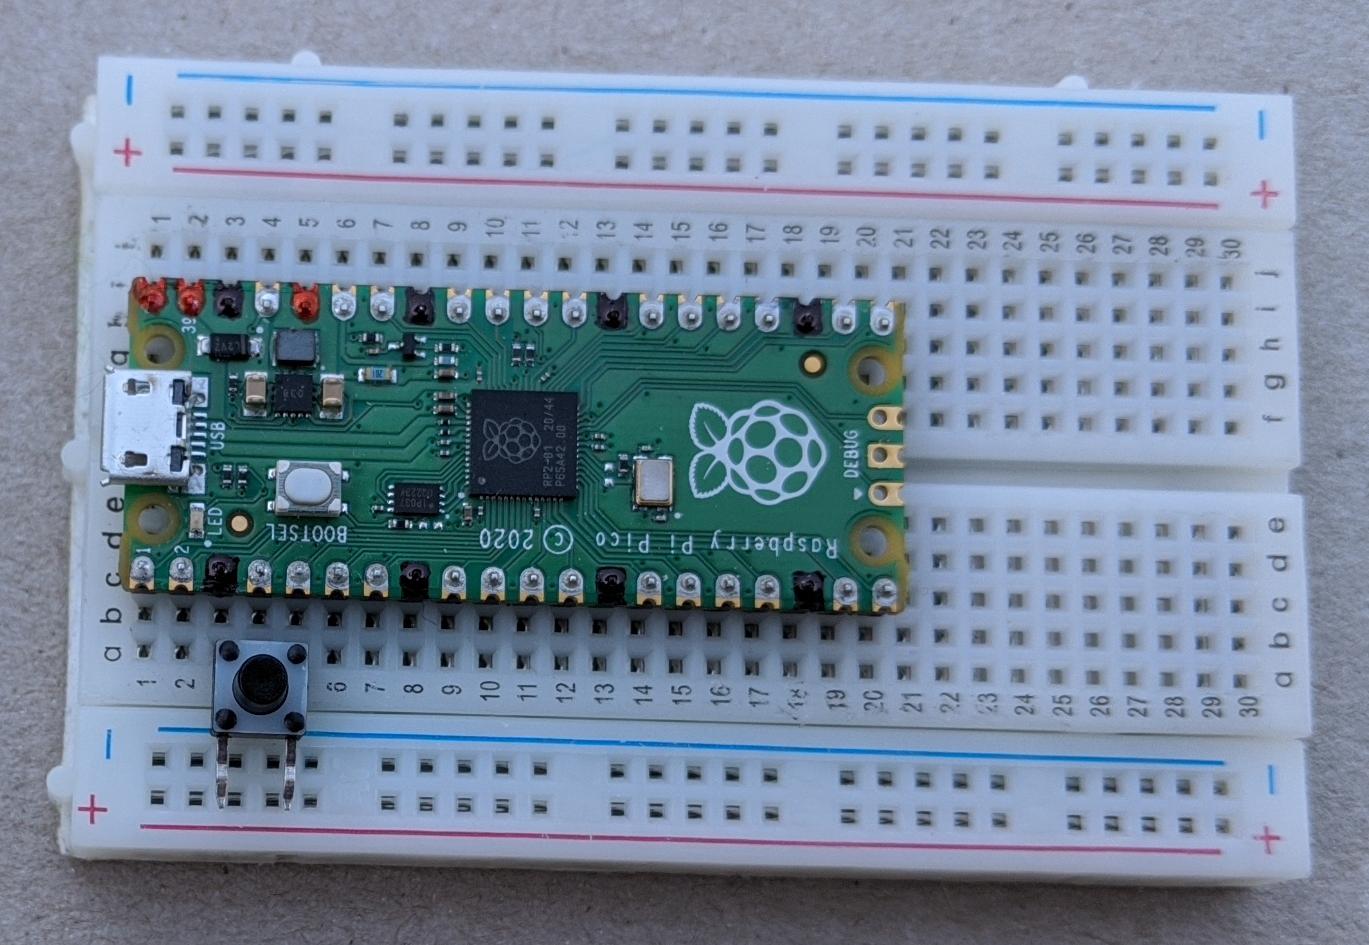
Base (breadboard):
- Pi Pico with headers
- 400 tie point breadboard
- small pushbutton (tactile switch) if using CircuitPython
- typically 3×3 on breadboard, but can insert 2 pins and flatten the others
- a wire can be used instead: add for updates; remove for normal use
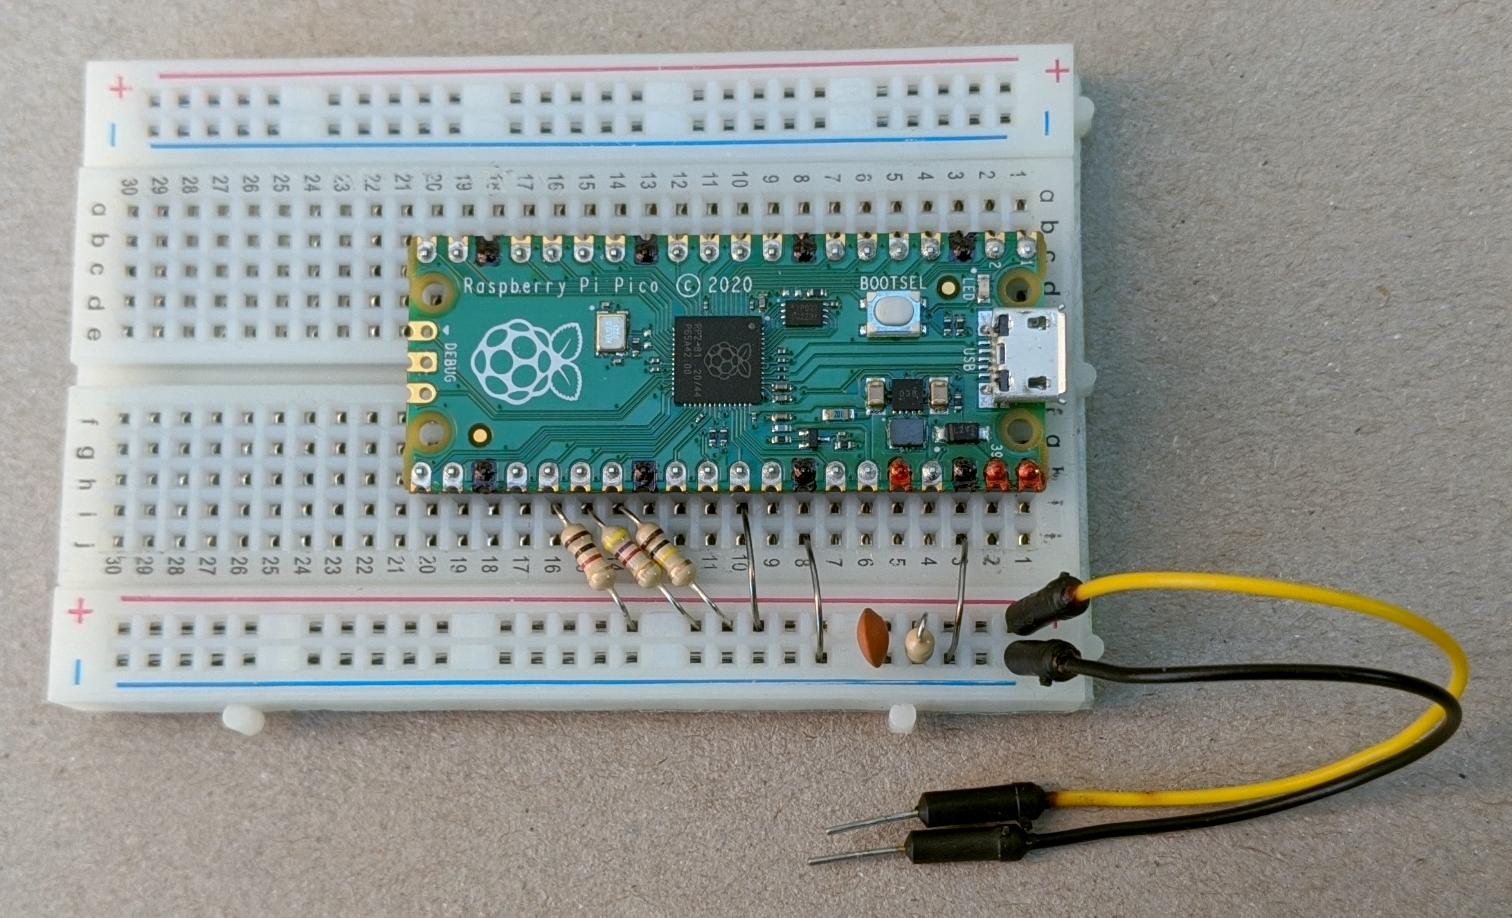
Prong circuit (old breadboard, don’t copy this exactly: prong_in has been moved from GP26 to GP22, and a resistor has been changed from 4K7 to 6K8):
- Resistors, 1 each of 470K, 100K, 6K8, 1K
- 1nF ceramic capacitor
- 3 short wires
- Connector to toy e.g. 2 breadboard wires
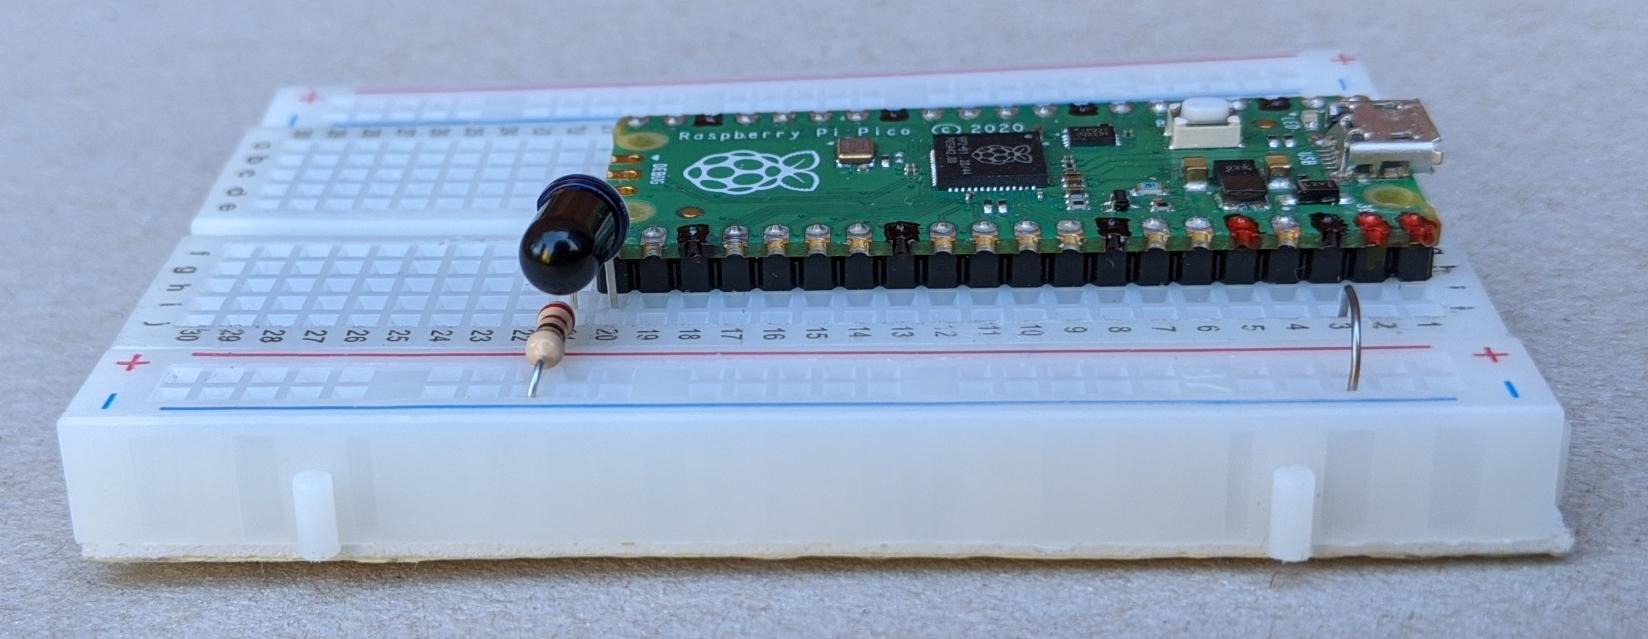
IR LED circuit (breadboard), shared between all IR devices and D-Scanner barcodes:
- IR LED, 940nm or 950nm; OFL-5102 or LTE-4208 works well
- 220R resistor
- 1 short wire
- can be shared with prong circuit
- or can connect resistor to nearby ground pin instead, but it’s a bit tight
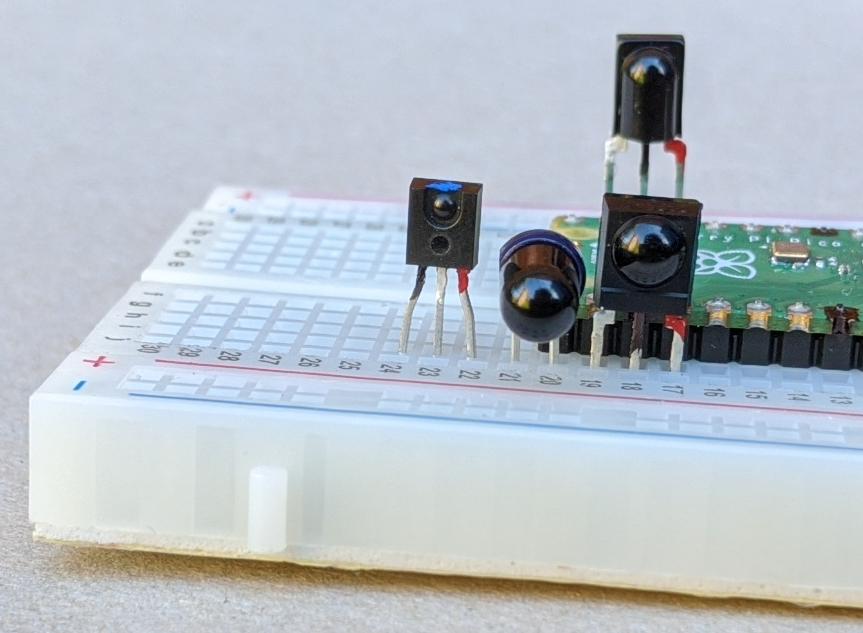
Data Link and Fusion Loader (front-right in this photo):
- TSOP4838 IR sensor: Vishay brand recommended, others may have issues with Data Link
- (Also need the IR LED circuit)
iC/Twin/DigiWindow (back-right in this photo):
- TSMP58000 IR sensor: this is discontinued, see schematic for alternatives
- (Also need the IR LED circuit)
Talispod/dam:
- Note this was originally on GP8 and GP9, then only on GP9, now on GP15!
- 1K2 resistor (1%)
- 3K3 resistor (1%)
- 1nF ceramic capacitor
- 3 short wires
- 1 breadboard wire
- Connector to the toy
- Note: we can’t just stick wires into the prongs as with Digimon
- Craft a connector?
- Desolder a Talisdam cord, replace with something else, and use the cord with other toys?
- Xanthos has connectors for sale
Arduino
Only pronged devices are currently supported. Usage is the same as for the original version. The CircuitPython firmware option is now recommended instead.
In the Arduino IDE, install “Arduino Mbed OS RP2040 Boards” using the Boards Manager. (This project uses the official Arduino support and not the older unofficial one from Earle Philhower.) To flash the Pi Pico using Arduino for the first time, you need to hold the BOOTSEL button while connecting to the computer. Flash ClassicComUnit from dmcomm-arduino-lib.
CircuitPython
WiFiCom firmware (recommended)
Follow the instructions at wificom-update-tool.
Manual setup for dmcomm-python only
- Download CircuitPython 8 from the website (note that a different image is required for Pico and Pico W). Tested with
8.2.2. More recent versions will probably work. - Connect the Pi Pico to the computer while holding the BOOTSEL button. The RPI-RP2 drive should appear.
- Copy the CircuitPython image to the RPI-RP2 drive. The CIRCUITPY drive should appear.
- Get dmcomm-python and unzip.
- Copy
boot.py,code.py,board_config.py, and thelibfolder to the CIRCUITPY drive (there might already be alibfolder there, so really you are copying thelib/dmcommfolder into it). - Safely remove the CIRCUITPY drive from the computer and reset/replug the Pi Pico.
- Now you can use the usual apps as for an A-Com. Alpha Serial shows some odd output at startup, but this is not a problem.
- To update CircuitPython, repeat the first three steps.
- To update DMComm, replace the specified files on the CIRCUITPY drive with new ones from the git repo. To make CIRCUITPY writeable, you will need to connect the Pi Pico to the computer while holding the custom button (wait until CIRCUITPY appears before releasing the button). If you don’t have a button, connect GP3 to GND with a wire, then connect the Pi Pico to the computer.
Usage
- Pronged protocols are the same as for the Arduino version.
ICfor the iC uses the same 16-bit system as prongs, including the@and^calculation options. (Nothing changed from the experimental!IC, so if you have a!ICcode, you can just remove the!.)BCfor D-Scanner barcodes takes 13 decimal digits, and is used only with turn1because it is transmit-only. (Nothing changed from the experimental!BC, so if you have a!BCcode, you can just remove the!.)DLfor the Data Link uses a sequence of bytes.__is used for mirroring a byte,>>for the ID shift byte, and+?for the bugged checksum function.!DLcodes had the bytes in reverse order: to use them with the latest version, they will need to be converted usingutils/byte_reverse.py.FLfor the Fusion Loader uses a sequence of bytes.__is used for mirroring a byte, and++for the checksum.!FLcodes had the bits in reverse order: to use them with the latest version, they will need to be converted usingutils/bit_reverse.py. (Nothing changed between!!FLand the final version, so if you have a!!FLcode, you can just remove the!!.)Cfor the Digimon Color uses a sequence of 16-bit values.____is used for mirroring a value, and++++for the checksum.- Experimental protocols start with
!. These may change at any time. - Turn
0is not fully supported on infrared (will only capture one packet). - For iC, Twin, Data Link and Fusion Loader, don’t hold it too close to the circuit. Using the layout above, about 5cm from the LED seems good. For the Twin, hold it at an angle so the IR window is facing the LED (even connecting two Twins, holding them with the corners facing gives a much longer range than the way you’re apparently supposed to hold them).
- For D-Scanner barcodes, hold the barcode scanner close to the LED, maybe almost touching.
- Xros Loader is not supported in this version. Please get in touch if you want to help gather data.
Digimon Color
Thanks to jyoshiikuta.
C1-47444C4300000000000E00AA00019440-47444C43000200000000000000009389- Battle vs Ver.1 BlitzGreymonC1-47444C4300000001000F00960002942F-47444C43000200000000000000009389- Battle vs Ver.2 CresGarurumonC1-47444C43000000020002001E000393AC-47444C43000200000000000000009389- Battle vs Ver.3 ChildC1-47444C43000000030002001E000393AD-47444C43000200000000000000009389- Battle vs Ver.4 ChildC1-47444C43000000040002001E000393AE-47444C43000200000000000000009389- Battle vs Ver.5 Child
iC
IC1-C067-4257-0197-0007-@F007- Battle with iC 10x for Digi Shop 1IC1-D067-4257-0197-0007-@F007- Battle with iC 20x for Digi Shop 2IC1-E067-4257-0197-0007-@F007- Battle with Burst for Digi Shop 3IC1-D577-4927-0B47-0007-@F007- Battle with DigiWindow for Digi Shop 4
Twin
jyoshiikuta shared a spreadsheet.
Data Link
DL2-1301002000AA>>+?-1301002000AA>>+?- 2000 pointsDL2-120100030FAA>>+?-120100030FAA>>+?- Health Bar (food)DL2-1201000034AA>>+?-1201000034AA>>+?- D-Charger (item)DL2-1201000200AA>>+?-1201000200AA>>+?- Dragon DNADL2-1201000201AA>>+?-1201000201AA>>+?- Beast DNADL2-1201000202AA>>+?-1201000202AA>>+?- Insect DNA
Special evolution items unfortunately cannot be traded, even though the menu option is there. Toys and other types of food seem to be just cosmetic and have no particular effect on gameplay.
Fusion Loader
This device seems to retry individual packets. The software doesn’t do this, which basically means the toy gets stuck for an annoyingly long time after a communication error, but it does work most of the time.
For trading, only the sending side can initiate. The receiving side varies with the Digimon sent. If it does not match, the communication completes and the toy says “OK”, but the Digimon has not actually gone.
FL1-D0110401010000000202030000000000EE-D009060000000000DF-D0040FE3- example battleFL1-D00400D4-D0050202D9-D0040FE3- send AgumonFL1-D00400D4-D005020CE3-D0040FE3- send AquilamonFL1-D00400D4-D005020FE6-D0040FE3- send BallistamonFL1-D00400D4-D005022D04-D0040FE3- send DevimonFL1-D00400D4-D005024920-D0040FE3- send GuardromonFL2-D00401D5-D0050302DA-D0040ADE- receive AgumonFL2-D00401D5-D005030CE4-D0040ADE- receive Aquilamon
D-Scanner
BC1-0000000000111- scan Gabumon on D-Scanner v1BC1-0000000020211- scan Renamon on D-Scanner v2BC1-0000000750311- scan Bearmon on D-Scanner v3
The complete list is in a spreadsheet.
Further research
Let’s chat before duplicating effort! A lot of data has been gathered already.